Sorry for the lack of posts the past month. I've been busy packing to move. I'll have a few projects up this month to make up for the lack of adventure in Aug.
Namaste
Tuesday, August 30, 2011
Saturday, July 23, 2011
Back to the 60's
In my stash of patterns, like most of you out there, I have patterns I've sat on and never used. I have a handful that I got at a church rummage sale back in 1995 and a few I picked up in 1997 when I moved to Jacksonville,FL. Of those I decided to try my hand at one of the cute 60's dress patterns I got here in J-ville.
The pattern is an original not a re-launch. The instructions are hilarious and quite dated. I used white khaki material for the dress. It is very see thru so I'm looking to get some teal dye for it and possibly do a duel tone dye (teal and lime).
Here is the pattern:

Here is the version I made from the exact directions:


This was the first project I made with my new Bernina series 330. I plan to make another version of this dress but a little more updated. Meaning: use bias tape instead of lining it. Its way too bulky with the lining. The Bernina 330 handled everything like a dream, down to the buttons and button holes.
Off to continue my current projects. I'm tinkering with bike bags and mp3 player arm bands this weekend. Now that Blogger seems to be over its log in issues with my accounts I should be updating again on monday. Hope you all enjoy your weekend!
Namaste.
Sunday, June 5, 2011
ITS HERE!!
I am a bit overwhelmed and excited. Just a bit. *giggle* I got word that my new Bernina machine was ready to be picked up on friday and I picked it up on saturday after noon. I got to learn a few things about the Bernina 330 while I was in Paula's Fine Fabrics. My class lessons are postponed until July. A little bummed I have to wait but its going to be worth it. So back to the test drive, WOW! Bernina is just amazing. The machine is very smart (it has a memory for stitches that you've done and can be easily programmed) and easy to use. So far I'm absolutely in love with the feel of the machine. Its very sturdy but has an aire of modern (sleek silver accents and lcd panel) to it. The 330 has little thread cutters places in places you need them, like near the bobbin (it self threads the bobbin..no need to pull it thru the top!!) and the bobbin winder as well, not to mention to the side of the sewing foot. *giddy* Threading was a breeze, making a bobbin was a breeze. I think the foot pedal might be one of my fave features as to the aesthetics of the machine (i'll make sure to get a picture of that soon). The cord winds into a self contained compartment on the bottom. No more loose cords!
I took it out of the box last night and have it all set up. Now that I'm done with my impromptu callin and my errands have all been run I am about to go break it in. skiddlydoo!
Here are a few photos of the machine I got.


with the dust cover on, its sexy. It has pockets for the cords and pedal to rest in.
While I was waiting for my bernina to get here I started some micro greens. Its been fun trying to get my thumb from brown back to green. Since living in Fl my experience with growing things has been terrible so I picked up a few books on growing microgreens. Its only been a few days since I got seeds into dirt and they are coming along very nicely. Growing indoors always seemed like it might be hard but so far its been convient and easy.
here are a few pix of how they look so far:


mesclun lettuce mix (these are fast growers. I have 2 other types of lettuces I want to get started as well...then I will dive into some wheatgrass)

Beet micro greens (I love that some of the seedlings have a nice red hue already, tangy!)

snow peas as micro greens

Garlic Chives (these and most herbs will take a little longer to start sprouting)
I didn't know how easy and useful mircogreens really are. They can be used in salads, sandwiches, smoothies, and juices for a punch of taste and a boost of vitamins (and other good stuff). Growing them is as simple as reusing old containers (with holes poked for drainage) and a little seed starter dirt or pumice (which I will be trying as soon as I can find some, lol). Keep them in a sunny window and water as needed (when the dirt is dry to the touch or finger deep). They only grow a few inches before you cut them and nom them. After you've cut them some grow back in a few days and others need to be tilled and new seeds planted. Since they grow rather fast its not such a pain to replant new seeds. So far so good. I'll post a little update with my next project post once I've got some sewing done.
Have a good week! Thanks for checking in.
Monday, May 30, 2011
Spats and Straps **Updated!
The most sewing I've done in the past 2 weeks has been making Spats (to fancy up my heels) and Recycled Seatbelt Guitar Straps. I should have some pix up soon for both and a little more about how I made them.
** Updated **
Here are the pix of the straps I mentioned.

Hanging up to dry after a good washing

another shot while drying.

Green Bikes screen printed on grey recycled/upcycled seatbelt webbing. (I made the bike graphic as well)

A shot of both the brown and grey straps. The brown has stars screenprinted.
I also made a few crocheted Guitar Straps. They have been tried and tested. Worked amazingly well even if they look like thin scarves. :D


The crocheted straps were a single stich a chain of 7 and go as long as you feel you need to comfortably support your guitar.
The seatbelt straps were cut from a standard sized strap and I made my own tabs for the ends.
I've been patiently awaiting the info to get my new Bernina machine. I really can't wait to get it. I've had so many issues with my current machine lately. Trying to get a nice straight line has been hard. ugh.
The June Artwalk is only a few days away. I'm trying hard to get all my current projects finished up before then. I came up with a new wallet pattern and haven't had the time to execute it yet. Hopefully I will be doing that later today.
** UPDATED **
I ended up missing Artwalk this month. A huge bummer. I was looking forward to the new location a friend had suggested selling at. Hopefully next month will be better and I can make it back out there.
Happy Memorial Day.
Saturday, May 14, 2011
Super Uber Giddy!
I finally got my letter from Bernina!! I'm sewwww excited!! I'll find out sometime in the next few weeks (hopefully soon) when I can pick up my new machine. My project lists keep getting longer and longer with things I'm going to make.
This past week had been a little bit of sewing slackery. I broke down and bought a doo-hickey to make my own bias tape. It was so much easier than my free hand attempts in the past. I found out that a 1/2 yd of fabric will make roughly 11yards of bias. The fabric I got to try out cost me .75 for a 1/2 yd. What a deal!!
Why the sudden urge to make my own bias tape?? I made a new pattern for my comic-book wallets!! I drew up a pattern for a tri-fold (vs. the bi-fold I had been making) wallet. Complete with change pouch, Id pocket with see-thru window, and the credit card / cash pockets. This weekend I plan on doing the first test-run of the wallets. I'll post some pix of the process and the finished wallet sometime during the week.
I've been tinkering with making frames for Art I'm in the process of painting, finishing guitar straps, going thru the fabric stash for summer clothes, and trying hard not to overwhelm myself with too many unfinished projects. I'll be the first to admit I have a touch of crafters A.D.D. Oh yes. I admitted it! I get so many ideas and even after writing them down in a sketchbook I still have an urge to just jump into it and try out the idea. Sometimes it leads to several unfinished projects. With the whole "spring cleaning" aspect in mind I have been doing my best to get all those little undone projects, done.
This coming week I will be making the new version of my comic-book wallets, a new ironing board cover (which didn't hit me til i was making the bias tape) as my old one is icky to look at, a pair of spats, cutting a pattern for a dress, and patiently awaiting my new BERNINA machine!
A fun productive weekend to you all.
Tuesday, April 26, 2011
The Hot Seat
I did a search on Ravelry.com and found ONE bike seat cover that I really wanted to try out.....I went to the link and it was all in Dutch. OH NOES!! Normally my MAC can translate but for some odd reason there were errors on the page and I couldn't get it translated.
Instead of wanting to bang my head on the desk I decided not to get discouraged. I took some light weight clear vinyl and traced the seat of my bike. From there I just winged it. lolz. It took a few hours, 1 skein, and 2 partial rips to get it right. I'll get motivated this week and write out the pattern (yeah I'm one of those people that forget to write it as they go). I've tested the cover and LOVE LOVE LOVE it!! I want to try using PLARN with lightweight poly (spin plarn with the light weight yarn) for the next one and see how that one holds up.
Since I have the vinyl pattern I figure I might as well see about making some with fabric.


Saturday, April 23, 2011
Easy Fabric Labels
I tend to be cheap when it comes to items I WANT but might not NEED. Personal Labels have been on my 'want' list for a while now. They tend to be a little expensive to special order and I don't own a nice embroidery machine to zip a few up on a whim. What I do own is a computer, a printer and a few other items to make easy labels.
I've seen packages of Printable fabric paper available pretty much everywhere now. Bleh. That is still out of my price range. I did mention I'm cheap didn't I? You can try using pre-packaged printable fabric, this project doesn't use it. This project was posted on a forum I'm a member of, I didn't think it up I'm just passing it on. I have added my commentary in (( double brackets)).
Total Cost for project depends on how many labels you are looking to make. I spent $7 in total for a roll of freezer paper and 12" of cotton fabric. Freezer paper was just about $6 of that budget. Its a huge roll so I know I'll be using it for several other projects as well. It will get used!!
Supplies:
* Microsoft Word, Open Office or Adobe Photoshop ((I own a MAC so I don't have 'Word', I used a free program from http://www.avery.com that has free templates))
* B/W or Color Printer ((I used a color printer))
* good quality, thin, evenweave cotton ((Zippedshut used 100% cotton from the fabric department of wal-mart))
*freezer paper (it's paper on one side and plastic on the other. Reynold's makes a nice one)
*white vinegar
*baking sheet
How To:
1. Create a document template with rows and columns which are the size of clothing label you would like. Be sure to include seam allowances on whatever side you'll be attaching your label with. ((If you've downloaded the free Avery templates this goes faster plus you can add images if you'd like))
2. Using the font of your choice, clip art, etc., create your labels within the template.
3. Prepare your fabric. Wash (do NOT use fabric softener) and rinse with a vinegar solution to be sure that all sizing/soap residue is removed. Tumble dry for 15 minutes (NO dryer sheet) and then iron while slightly damp (NO startch) . Be careful that the fabric remains on the grain and doesn't stretch or twist.
((I skipped this step. lol. You can do it or skip it. I can say from experience that it won't make a difference))
4. With the plastic side facing the fabric, apply the freezer paper to the fabric with a hot, dry iron. It might bubble a bit. Don't worry about that.
5. Using a piece of paper from you printer as a template, cut out sections of your paper/fabric.
Note: You can either cut on the grain or the bias. I cut mine on the bias so that I could leave the edges raw and they wouldn't fray.
6. Print your label document on the paper/fabric pieces. Be sure that the edges lay flat when you insert them into the printer or it might not feed properly.
7. Remove paper backing and allow ink to dry completely.
((once I let the ink dry I went ahead and ran the iron back over the labels before stripping off the paper backing. Heat sets the ink nicely even if you have already peeled the backing off))
8. Fill a baking sheet with vinegar. Soak your sheet of labels for about five minutes (this sets the ink, further). Remove, and rinse with cool water.
Note: Some colors will bleed or fade when placed in the vinegar bath, hence my suggestion to use black.
(( I did a set with half black and half green. The black stayed thru vigorous washing by hand. The green faded after a few times in the sink. I suggest making a test page of all colors and seeing what does what. I'm going to attempt a rainbow test page today.))
9. Tumble dry on high heat until only slightly damp, and then iron with a hot iron. This finishes setting the ink.
10. Cut your labels to size.
And you're done! You'll be surprised how easy it is and how good they look. I've been sewing for so long, it's a lot of fun to finally have my own labels. :)
I found this to be a quick and helpful project. Hopefully it helps you as well.
Friday, April 15, 2011
Bernina My Label
I came across a pattern drafting program by Bernina. Has anyone else seen this or used it yet? : MY Label Looks like an amazing program. I'm quite bummed out that it isn't available on MAC. For those of you that have a PC you should check it out!!
In other news, I came in 2nd in the Burda Style / Bernina Brand Ambassador Contest. I'm elated. After I got the email earlier I was bouncing around the house doing a happy dance. Yes even at 31 I do happy dances. I can't wait to become an Ambassador and of course try out one of their machines. The contest was a lot of fun and quite a learning experience for me. I got to try my hand at making a Stop Motion video and create puppets. Just one more thing I will continue to add to my project lists (the puppets).
For the next year I will be tracking my projects and experiences with bernina. I hope you stay tuned in.
Monday, April 11, 2011
Sew much to do, sew little time
Its been a busy week. I went out and picked up a dapping/doming set and have been tinkering with it non-stop. I'm sure the people in my household are sick of the bang bang banging coming from my room. hehe. I have taken a small break from that to pull out the screen-printing. That in itself has been quite a pain in the rump. I'll be working on that again tomorrow then back to some sewing.
I'm just about finished transferring the previously posted skirt to a PDF Pattern. Hope to have it up on Burda by the weeks end. I have a pile of pieces cut to make some more skirts. Pix will be up once they are finished.
I ran across an amazing tutorial for making clothing labels. I should have that up soon too. I wanted to try it out before I post it.
Tuesday, April 5, 2011
Burda Style / Bernina
I got picked for the top 5 in the Burda Style / Bernina Ambassador contest. I'm so elated. It was such a fun project and quite a learning experience!!
If you want to check it out and vote for me or any of the other 4 finalists you can here. Such amazingly creative videos. I'm happy I got to be a part of this experience.
***UPDATE they changed the link from this morning. Those votes on the old link are not going to be counted. =[ I'm super sad about that. If you already voted please use the link above that has been edited to the new address. Thank you so much for your vote and support!!
Friday, April 1, 2011
New outfit
Its not quite a 'spring' outfit but its done and I can't wait to wear it!!

 My sister picked up this skirt (the grey one to the side there -->) way back in '05 for me. She had worn her red one (just like it) to my house. I loved the flow it had. I couldn't believe she went out and bought me the grey one. Needless to say I've had it a while now and its been thru a lot of wear. Every time I've worn it I've thought about using it as a pattern to make more. Laziness ..oh pure laziness. I finally made a pattern from it (this past week), without taking it apart (one of those side effects of laziness, haha). The pattern came out very well and was incredibly easy. Its 4 pieces. Front side, front split, back, and waist band. It took longer to take pictures than it did to make it.
  The skirt fabric is lightweight knit. I know I've had this stashed away, for a while, with the intention of making a nice fall dress or skirt and wrap top. I didn't realize HOW much I had bought at the time. Turns out I have more than enough for a dress and a top even after making this skirt!!

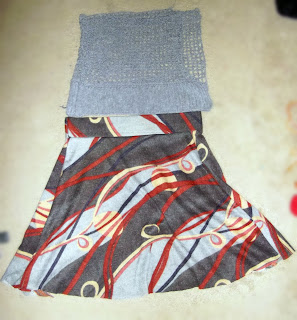


Ta-Da!! The skirt is done!!
 My sister picked up this skirt (the grey one to the side there -->) way back in '05 for me. She had worn her red one (just like it) to my house. I loved the flow it had. I couldn't believe she went out and bought me the grey one. Needless to say I've had it a while now and its been thru a lot of wear. Every time I've worn it I've thought about using it as a pattern to make more. Laziness ..oh pure laziness. I finally made a pattern from it (this past week), without taking it apart (one of those side effects of laziness, haha). The pattern came out very well and was incredibly easy. Its 4 pieces. Front side, front split, back, and waist band. It took longer to take pictures than it did to make it.
  The skirt fabric is lightweight knit. I know I've had this stashed away, for a while, with the intention of making a nice fall dress or skirt and wrap top. I didn't realize HOW much I had bought at the time. Turns out I have more than enough for a dress and a top even after making this skirt!!
Close up of the crocheted tank top (just about done)

Last month while I was Artwalk I was working on the crochet top above. Its just about finished. Just need to bind the edge and add the straps.

I'm really happy with how this outfit has turned out. I plan on digging thru the fabric stash to make some more skirts soon.
I still find it amusing that as a child and young adult I despised wearing skirts and now I find myself wearing dresses and skirts a lot.
I'll be posting this up on my burdastyle profile and will get the pattern scanned/instructions if anyone is interested.
Keep on stitching.Thursday, March 31, 2011
Artwalk prep
Artwalk is a little under a week away. I was shocked I sold as much as I did last month. It took 2 weeks to fill orders and I'm still getting restocked on other items just to sell.
I've been getting that feeling that the line between selling art I make and making art to sell is going to be blurred eventually. *sigh* If the enjoyment fades its more like a job. Thankfully I enjoy every moment of making art that sells. Everybody wants to make money..more so whilst doing something they actually like. Its hard not blurring that line just to get the bills paid. /rant
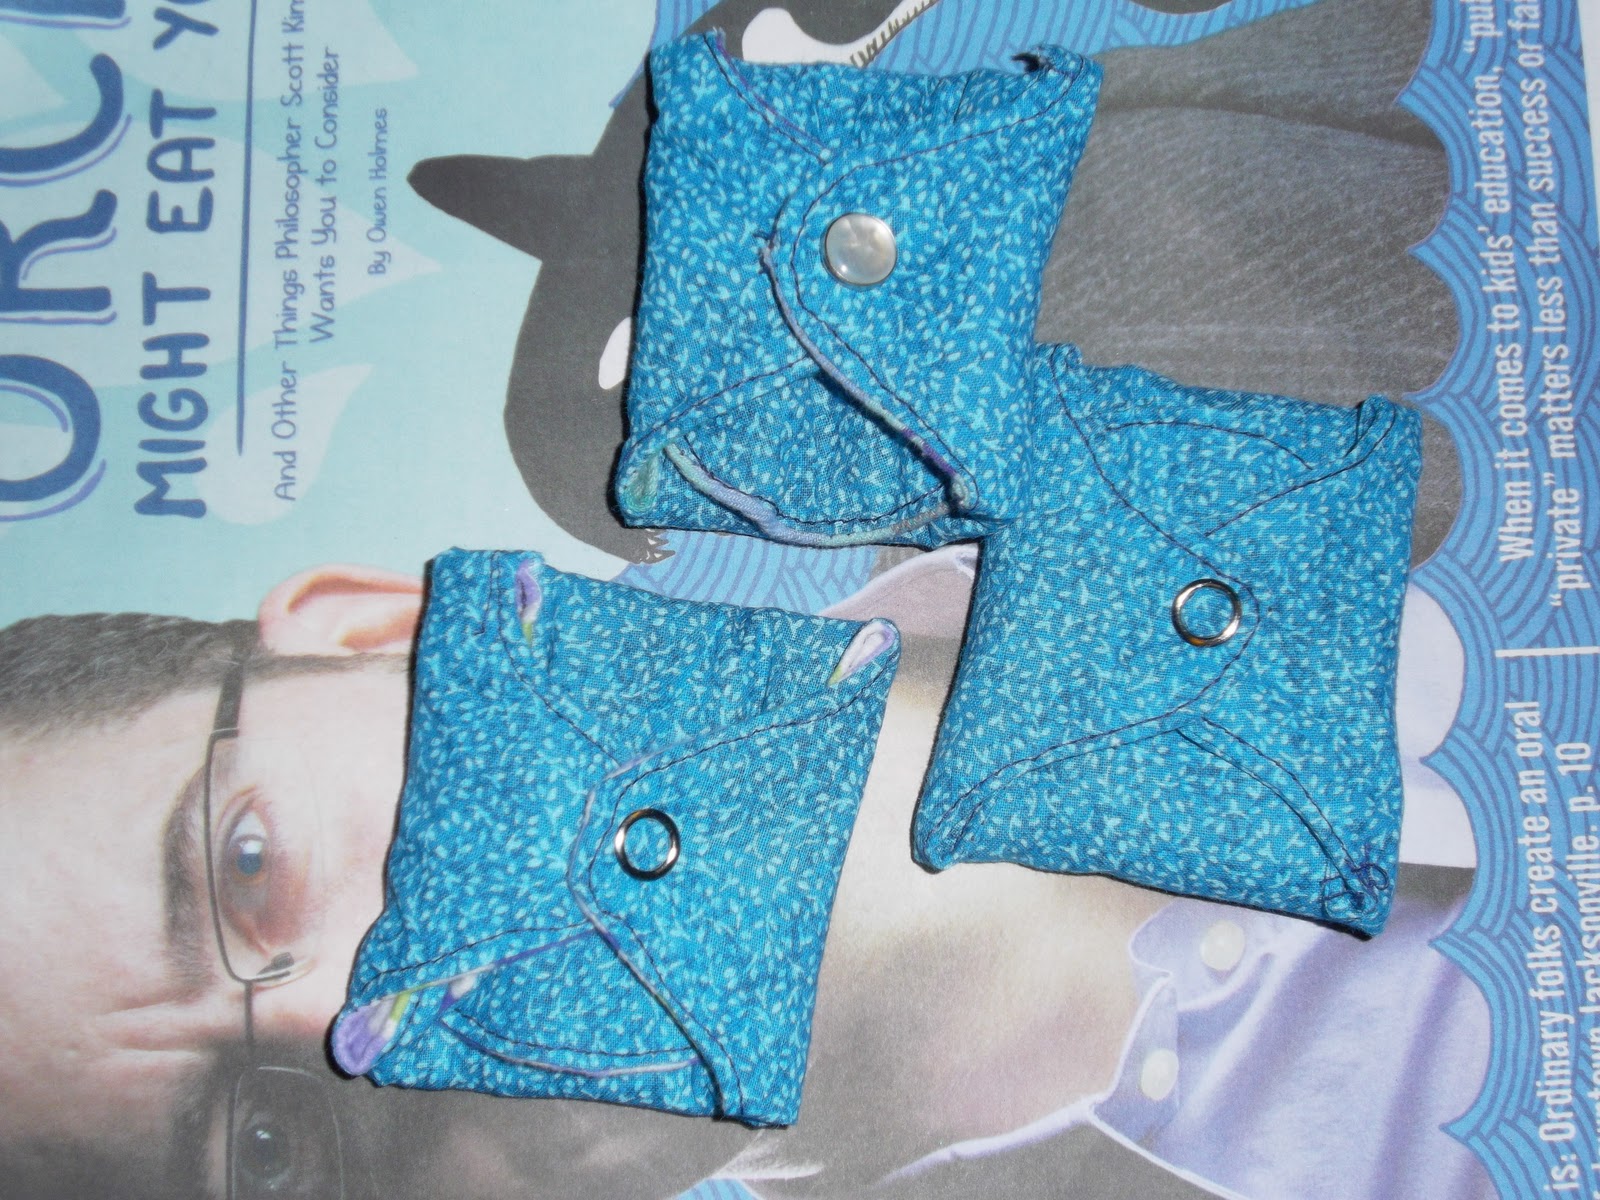
I put my sewing machine thru heck making Comic-Book wallets. Here are a few of the filled orders, a pay-it-forward project, and the restocks.


I've been getting that feeling that the line between selling art I make and making art to sell is going to be blurred eventually. *sigh* If the enjoyment fades its more like a job. Thankfully I enjoy every moment of making art that sells. Everybody wants to make money..more so whilst doing something they actually like. Its hard not blurring that line just to get the bills paid. /rant
I put my sewing machine thru heck making Comic-Book wallets. Here are a few of the filled orders, a pay-it-forward project, and the restocks.


time to get back to the machine. I have an outfit to finish so I have something to wear to artwalk. I'll post the outfit once I'm finished.
Saturday, March 26, 2011
Taking it back
This might be a little on the gross side for some readers. Just a little warning.
My latest project "Taking back the rag"
Basically this project is helping me be a greener me and taking a step off the grid. Using less plastic and packaging. I had used O.B. (wrapped individually with plastic BOO) since I was 14. About 4 yrs ago I came across a product called INSTEAD. I tried it...loved the product and the fact that I use 2 of those a day instead of 6-10 tampons a day but hated that I was still using plastic products. I'm on the last box of INSTEAD and decided that it was time to get the DIVA cup. I still felt I needed something else to cover those light days so I looked up rags. Its been a fun project.
I've had a pair of old flannel PJ's in my fabric stash that I've been hoping to upcycle and finally found the perfect project!! Turn them into cloth pads. The only thing I purchased to make these was "warm and natural" batting for the interior. I had cotton cloth, snaps, vinyl backed fabric, and flannel on hand. This was a fun and easy project. I tried out a pattern I found online thru my research: Pauline's pattern didn't fit me. I used her pattern for the first one and then reworked the pattern to fit me. If I had pads on hand I would have used those for a base but alas I had none. I have also seen a circular pattern that I am going to be trying later this week. They look super easy to make and have a good amount of coverage. :D

 closed / opened
The next half of this "taking back the rag" project is making a few wet bags and crochet tampons.
I'm still researching the crochet tampon. I couldn't imagine its less safe than the chemically treated tampons in the stores. ICK. I'd rather give natural cotton a chance. If anyone knows more about them please drop me a line!
Wet bags/ reusable snack bags have been on my list for a while and now is the time to get them done. Summer is creeping up and I'd like to have them done for traveling and kayaking. Its nice to be able to take snacks and other goodies out on the water with me without plastic baggy's that might fly into the water.
My latest project "Taking back the rag"
Basically this project is helping me be a greener me and taking a step off the grid. Using less plastic and packaging. I had used O.B. (wrapped individually with plastic BOO) since I was 14. About 4 yrs ago I came across a product called INSTEAD. I tried it...loved the product and the fact that I use 2 of those a day instead of 6-10 tampons a day but hated that I was still using plastic products. I'm on the last box of INSTEAD and decided that it was time to get the DIVA cup. I still felt I needed something else to cover those light days so I looked up rags. Its been a fun project.
I've had a pair of old flannel PJ's in my fabric stash that I've been hoping to upcycle and finally found the perfect project!! Turn them into cloth pads. The only thing I purchased to make these was "warm and natural" batting for the interior. I had cotton cloth, snaps, vinyl backed fabric, and flannel on hand. This was a fun and easy project. I tried out a pattern I found online thru my research: Pauline's pattern didn't fit me. I used her pattern for the first one and then reworked the pattern to fit me. If I had pads on hand I would have used those for a base but alas I had none. I have also seen a circular pattern that I am going to be trying later this week. They look super easy to make and have a good amount of coverage. :D

The next half of this "taking back the rag" project is making a few wet bags and crochet tampons.
I'm still researching the crochet tampon. I couldn't imagine its less safe than the chemically treated tampons in the stores. ICK. I'd rather give natural cotton a chance. If anyone knows more about them please drop me a line!
Wet bags/ reusable snack bags have been on my list for a while and now is the time to get them done. Summer is creeping up and I'd like to have them done for traveling and kayaking. Its nice to be able to take snacks and other goodies out on the water with me without plastic baggy's that might fly into the water.
Wednesday, March 23, 2011
new new new
Gosh this is going to be the first of many posts. I tend to bog down my facebook with all the projects I complete. Seemed like a good time to start a blog and expand.
I sew as much as I can and find myself taking on projects that I haven't tried before and ones that I have lots of experience with. I make a little of everything these days. I enjoy making hand-sewn felt creatures, machine sewn clothes, and purses.
Projects I hope to be completing in the next few months: Machine embroidery, brand tags, and yarnbombing tags, summer skirts, wrap dresses and workout clothes.
Thanks for tuning in. :D
Subscribe to:
Posts (Atom)